i make signs for a living.
every day i come home with permanent marker smeared on my left hand,
and more often than not some amount of paint on my clothes.
and i honestly {usually} love it.
my friend maddie jo finally married her sailor last week and it was beautiful.
she requested i make something for her wedding weeks ago. i said yes.
then she showed me this darling but daunting picture:
ayeeee! how in the world was i to even attempt this?? i had never used chalk before and this thing was a goliath! 8'x8'. i swallowed hard and took the money for supplies, and after procrastinating enough, began the task.
i bought 2 4'x8' pieces of smooth, thin, but sturdy plywood {about $10 each} and primed them with a quart of {grey} gripper primer. next i rolled on black chalkboard paint, doing 2 coats for good measure. i waited several days to allow the chalkboard paint to cure and then transported the boards back to my lovely warehouse of employement {the depot}.
*total cost was about $75 {plastic drop cloths, primer, paint, roller, roller covers, chalk, plywood}
lucky for me, the depot has a projector. i did a rough sketch, tracing the outline of the original picture onto a transparency while adding in the correct names and such.
the picture below is right after using the projector to trace an outline with chalk. i had to adjust things a bit, since 'christensen' is such a long last name. i also decided not to include the siblings and only did the parents. because of the angle of the original photo, proportions were off slightly so i had to account and correct that, too.
after laying down one board onto the table, it was business time. my friend bill helped enormously, filling in my outlines and then smearing the chalk to create that lovely chalkboard effect. in total it took us 5 hours. here is a play-by-play.
{i sent maddie jo this picture, as a teaser, and she was ecstatic!}
here is the bride's board just after we finished the chalk.
to set the chalk, we used aerosal hairspray and matte clear coat protectant spray. at first it darkens the chalk, but we used an air compressor to speed up the drying time. it seriously was like magic, watching it come back into full white-chalk glory! we learned, however, to keep a safe distance when spraying as you don't want the chalk to become completely wet and dissolve. we only used the protectant spray after the hairspray.
upon completing the bride's board, the groom's board was a cinch. we knew what we were doing {plus he has a shorter last name} so it took us about half the time as the first board.
maddie joe cried when she saw it the next day. success!
she and her family picked up the boards. at the wedding site {noah's, in lindon} her brothers put together the frame to keep these beasty boards upright.
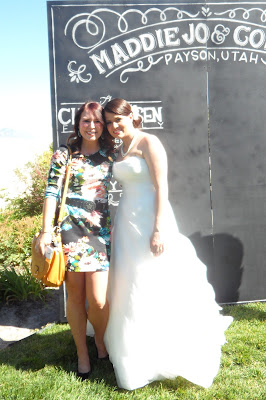
maddie jo and colten got married in front of my creation and it made my heart smile.
it was so sweet.
husband and wife!
me and the beautiful bride
maddie jo loves disney. obsessed, perhaps?
they sure looked adorable in their bride and groom mickey hats! on the back was embroidered in gold 'mrs. carter' and 'mr. carter'.
and that is the story of how i built an 8'x8' chalkboard and my friend got married in front of it!
after the wedding we had this fantastic southern feast inside noah's. here are some of my favorite work pals:


3 comments:
so cool!!!!! i love your dress too.
Thanks for the process documentation and the sharing :) I learn a lot from here
Thanks so much for this! I am going to be attempting to create one for my upcoming wedding & this is a tremendous help! Your board was gorg!
Post a Comment